Let’s start by getting familiar with the Construct 3 Animations editor – the in-engine graphics editor. Double-click a sprite to open it:

Next to some tools you’ll find a down-pointing arrow. It opens up subtools. At first glance it may look a little confusing, but let’s go through the tools and sections in order.
1. The toolbox
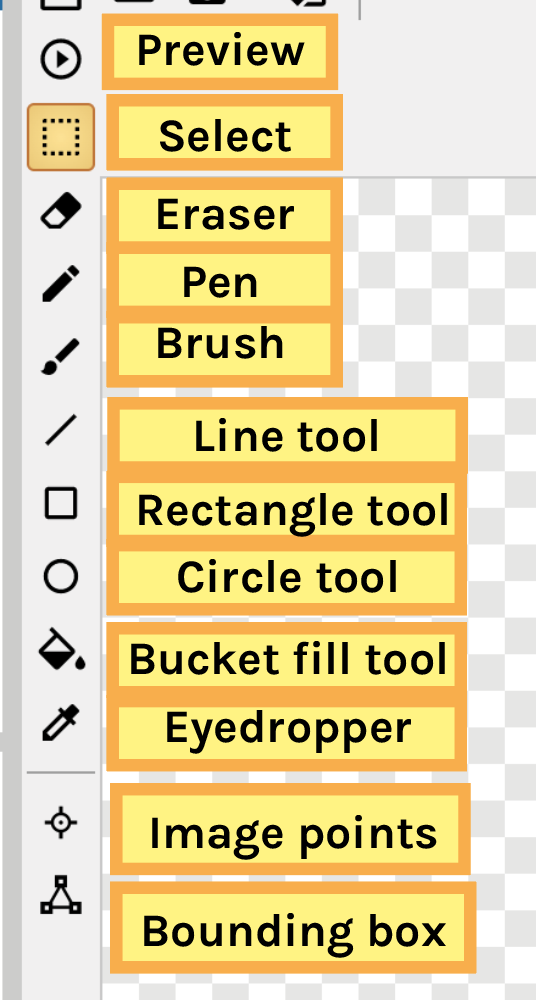
Preview
This button shows a preview of the current animation.
Select
Creates a rectangular selection for copying, cutting and pasting. A selected area can also be dragged.
Eraser
Erase to transparency. The eraser is round, and by default has hardness 1 (hard edges). For softer smooth edges, you can choose a lower hardness.
Pen
A simple square shaped brush for drawing with size-option. For a less opaque brush, change the Alpha-value of the color.
Brush
A more nuanced, round-shaped brush for painting, with sliders for size, opacity and hardness.
Line tool
Creates straight lines through click-and-drag (release mouse to end line). Options for thickness and opacity.
Rectangle tool and circle (ellipse) tool
Tools for creating rectangles and circles, which use the primary and secondary colors for fill and border (note: the shape tools disregard Alpha of the color). Click-and-drag to draw your shape. Hold shift to create squares and circles. Options for border thickness, and toggles for fill or border.
Bucket fill tool
Colors in an enclosed area with the primary (active) color.
Eye dropper (shortcut I)
Selects a color in the image and makes it the active primary color.
Image point tool (game logic)
This tool is used to edit or create image points in the sprite. A single image point defines the origin of the image – the pivot point. With multiple image points spawn points can be added on the sprite. For example, if your character can wear a hat, the image point can be used to define where that hat is created.
Bounding box (game logic)
This tool is used to edit the collision area of the sprite which is important for calculating overlaps, for example for the Solid-behaviour. Construct 3 automatically creates a collision area when you create the sprite, but sometimes it doesn’t match the sprite very well. In this case, do use the Bounding box tool to modify the collision area.
2. The top menu area – Menu, Undo, Cut, Rotation, Editor tools

Menu
Tools in order: Clear, Load an image from a file (import), Save (and save options), Export format
With the clear tool – the fresh paper sheet, you can empty whatever is on the canvas. The Load an image from a file-tool – the folder icon – lets you import an image from your computer. The floppy disk looking Save-tool saves the image onto your computer. The fourth button lets you choose an export format.
Undo & Cut
Tools in order: Undo, Redo, Cut, Copy, Paste
Next you’ll find the ever important history and clipboard tools. If you make a mistake, or need to copy and paste an area, these are the tools for you. These tools also work with keyboard shortcuts; Ctrl+Z, Ctrl+X, Ctrl+C, Ctrl+V (mac: cmd+Z, cmd+X, cmd+C, cmd+V) . As a subtool of undo and redo, you’ll find 10 steps of history.
Rotation
Tools in order: Mirror vertically, Mirror horizontally, Rotate 90 degrees anti clockwise, Rotate 90 degrees clockwise.
In subtools you can choose whether to flip or rotate the current frame only (default) or the whole animation.
Editor and canvas tools
Tools in order: Crop transparent edges, Resize (canvas), Zoom in, Zoom out, Zoom reset, Change contrast mode (light / dark background), Onion skin, Grid
With the crop tool you can trim your sprite down to only the areas with color information, either the current frame (default) or the whole animation (subtool).
By using the resize tool you can write in a new size for the sprite. Check ‘Keep aspect ratio’ if you don’t want distortions in your proportions. In the Image drop-down menu you choose whether the current image content is scaled (choose option: Stretch) or whether transparent pixels are created below (choose option: Align Top-Left) or around the image (choose option: Align Center).
The magnifying glasses let you zoom in and out on the canvas. The contrast mode switch changes the transparent background from light to dark and back. This can be very useful if your image’s colors are similar to that of the transparency grid.The onion skin (for Construct 3 premium users only) shows a faint overlay of previous frames in the animation, and the grid shows a pixel grid that can be helpful for editing pixel art sprites.
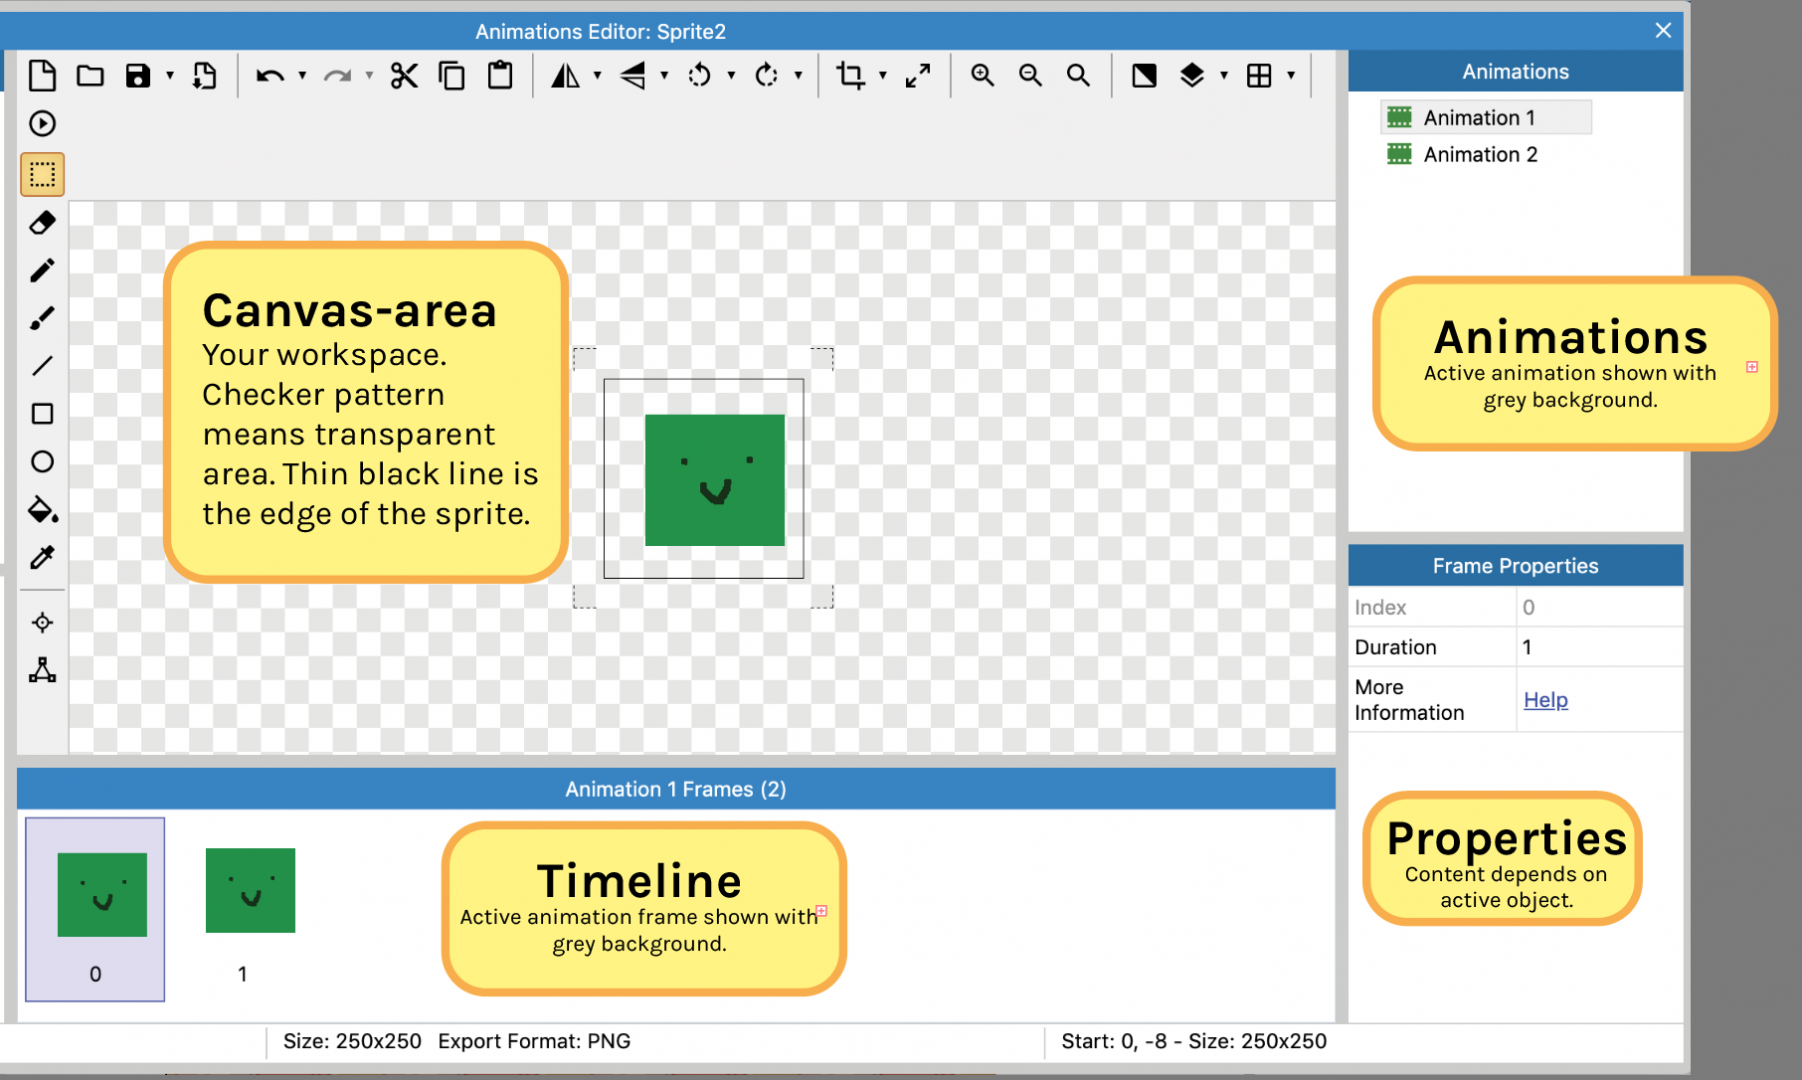
3. Animations, Properties and the Timeline
The animations-panel shows a list of your sprite’s animations. The active animation is shown with a grey background. The default is “Animation 1”. You can change the animation’s properties in the Properties panel, including name and whether the animation loops or ping-pongs or not.
To create another animation, simply right-click in the white area of the animations panel. To duplicate – create a copy – of an existing animation, right-click it in the animations-panel and choose Duplicate animation.
The timeline shows the frames of your active animation. You can switch between frames and create new ones through right-clicking. We’ll later go deeper into the animations in the section “Adding and making animations in Construct 3” (scroll below).
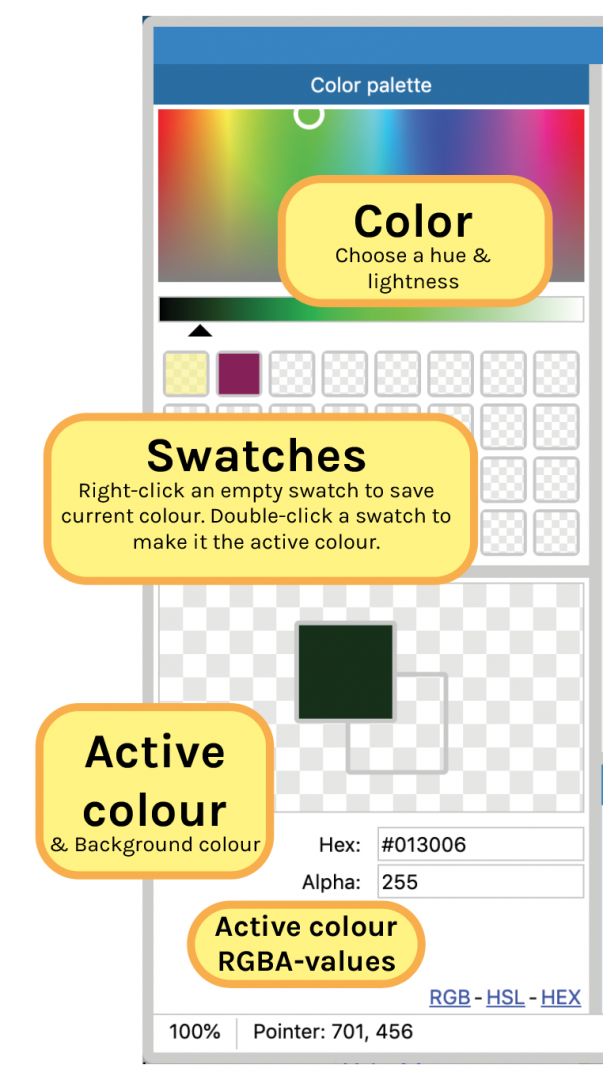
4. Color, Swatches and Active color
In these areas you can set the current tool color that the paint brush, pen and bucket fill tools use.
The active color (primary color, top color) and background color (secondary color, transparent in this case) are shown at the left-bottom of the editor. You can toggle between them with a click. Below the preview squares, you can find the RGB-values. If both squares show up empty, try changing the Alpha-value from 0 to 255.
The color gamut at the top-left shows the range of hues available. By clicking inside it you can choose a hue. Below it you can find a slider that determines the lightness of the color.
The swatches in between can be filled with colors you use often – a color scheme for the game – and will be available between sprites. Simply right-click on an empty swatch and choose Save primary color or Save secondary color to save swatches, and double-click a swatch to make your active color the swatch color.
Now that you’re familiar with the different tools in the Animations Editor, let’s move on to the next part of the tutorial:
Return to Tutorial 3 starting page: https://playableconcepts.aalto.fi/tutorials/tutorial-3/