For our final graphics tutorial, we will be looking a little more at the Text object in Construct 3. Through nice typography, you can give your game a little extra polish very easily, and make it fit together with its context better if you aim to embed into a webpage or presentation.
Creating a text object
Right-click > Insert a New Object > Text to create a text. Then, double-click the text to edit the content. Note: The content of the text object can also be changed during the gameplay if you code it so in the Event sheet.
The bounding box of the text can be dragged from the corners, and the text can be moved through drag and drop. To create a new line, hold shift down when pressing enter.
Text properties in Construct 3
The text’s properties can be changed in the Properties panel. These are the text properties:
Enable BBCode
- If you check Enable BBCode, your text can contain Bulletin Board code – bold and italics with the tags [b] and [/b], and [i] and [/i]. For more on BBCode, see https://www.bbcode.org/
Font
- Changes the typeface of the text. For more information, scroll to the bottom of this tutorial.
Size
- Changes the font size of the text.
Line height
- Changes the line height – spacing between lines – of your text.
Bold & Italic
- Check to make the whole text bold or italicized.
Vertical and Horizontal alignment
- Changes the alignment of the text, and where in the text box the text appears.
Wrapping
- Changes whether words split up or not when lines spill over. Use Words to keep words intact, Characters to maximize space usage of the bounding box.
Initially visible
- Is the text visible when you press play, or do you make it visible through the event sheet? This is a useful toggle for, for example, win screen messages.
Origin
- Defines the origin of the bounding box for transformations such as position and rotation. The default is the top-left corner.
Importing fonts
The Font option lets you pick a local font from your device or an imported web font of the project. You can choose whichever font you like to have in your game. But note that your local fonts won’t show up the same way on all devices. Construct 3 recommends importing your fonts, and especially the WOFF or WOFF2-font format – Web Open Font Format.
You can download free fonts on sites like Google Fonts: https://fonts.google.com/ In this tutorial we will be using the font called Chelsea Market, https://fonts.google.com/specimen/Chelsea+Market. Press “Download family” and extract the downloaded Zip archive.
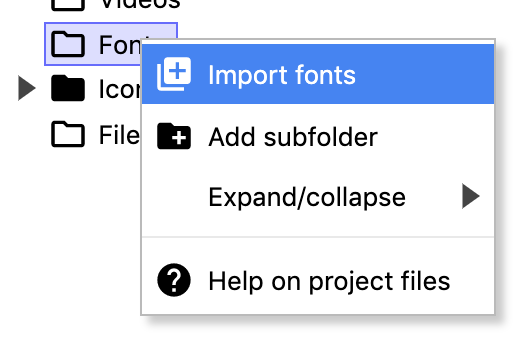
To import the font into Construct 3, right-click the Fonts-folder in your project archive and choose Import fonts. Select your font-file (.otf, .ttf or .woff file) and press Import.
Tip: You can preview the font by double-clicking it in the project hierarchy panel.
To make your text use the new font, simply press Font in the Properties panel. The newly imported font should show up under “Or pick a web font from this project.”

For more information on web fonts in Construct 3, visit the official Construct 3 blog: https://www.construct.net/en/blogs/construct-official-blog-1/integrated-web-fonts-construct-870
That’s all of the tutorials on audio and graphics in Construct 3! In the next tutorial, you will learn how to export and embed your game:
Return to Tutorial 3 starting page: https://playableconcepts.aalto.fi/tutorials/tutorial-3/